Contributors’ guide
Welcome! You are now entering the contributors’ guide. This page is for people interested in the details needed to contribute to NNMT. We want this Python toolbox to be a place for the Neuroscientific community to collect analytical methods for neuronal network model analysis. So we are glad that you made your way here and hope that you will find what you are looking for. Good luck and have a lot of fun!
Contact us
Contributions to our GitHub repository can be made via the GitHub fork and pull request workflow.
Any concrete suggestions or problems should be reported as issues on GitHub.
Setting up a developer environment
Fork NNMT on GitHub and download the source code to your local machine:
git clone git@github.com:<your-github-profile>/nnmt.git
cd nnmt
Then you need to install the package and all requirements. We recommend using
conda and the provided
environment.yaml:
conda env create -f environment.yaml
conda activate nnmt
Alternatively, you might install NNMT and its requirements in editable mode
using pip:
pip install -e .
After the installation, we recommend running the tests, which will take a few minutes (see Tests for more details):
pytest
If all tests pass (except for skipped tests), you should be ready to go.
Structure of repository
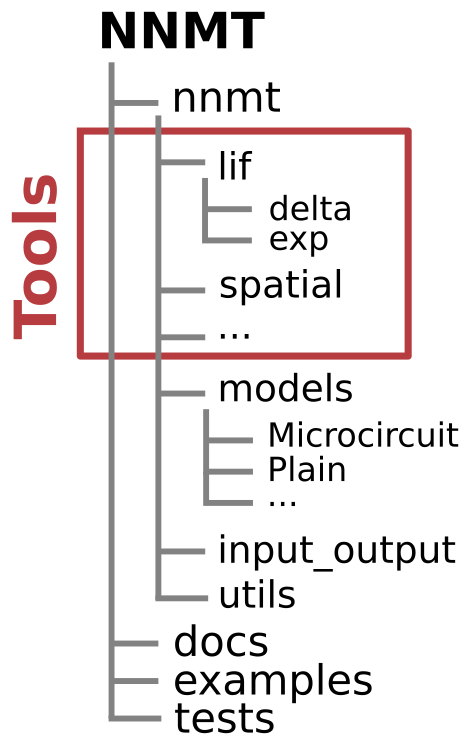
nnmtis the Python package itself.- The submodule
nnmt.modelscontains all the models. - The submodule
nnmt.input_outputcontains utility routines for input and output related tasks. - The submodule
nnmt.utilscontains helper functions used throughout the toolbox, like unit conversion functions, the cache function, or parameter checks. - All other submodules contain the tools.
- The submodule
docscontains the documentation files.examplescontains all example scripts.testscontains our test suite.
Design principles
The best description of the ideas behind the design of the toolbox can be found in our paper:
A mean-field toolbox for spiking neuronal network model analysis
Here we collect some principles that should be followed when writing new code for the toolbox:
- All calculations are to be done in SI units. We do not use Python
quantity packages like
pintorquantititesinside the actual calculations because this often causes problems in combination with special functions (e.g.erforzetacfrom SciPy). Although we do usepintfor converting parameters including units from yaml files to dictionaries. For more detail see the models section. - Resuse as much code as possible. If two functions in
different submodules (e.g. in
lif.expandlif.delta) use the same function, the function should be put into a higher module at a higher level. In thelifmodule we introduced the_generalmodule which serves this purpose. Keep in mind that if two modules that need a similar function are not both part of the same submodule, it might be sensible to combine them in a new submodule. - The package’s structure is supposed to be adapted in a flexible, non-dogmatic way. If the canonical split into neuron type, synapse type doesn’t fit, feel free to adjust the submodule structure accordingly. An inspiration to us was the submodule structure of SciPy, which (at least it seemed so to us) is rather free and fitted to the needs at hand.
Tools
Tools are Python functions and constitute the core of NNMT. They actually perform the calculations.
We decided to sort them into different submodules. Originally, starting off with tools for LIF neurons, we thought the most sensible split is according to neuron type (e.g. LIF, binary, etc.) and then, if required, another split according to synapse type (e.g. delta, exponential). But analytical theories of neuronal network models are quite versatile. Therefore other ways of sorting the tools might be more appropriate for different tools.
It is vital that all tools have meaningful names and comprehensive docstrings (see documentation section for more details).
If you make any well-thought-out decisions in the implementation of a tool, for example for optimization purposes, you need to write comments that clearly state the reasons for you to do so. Otherwise, someone else might come across your lines of code a few years later and change it, because it looked unnecessarily cumbersome at first sight, thereby destroying all your precious efforts.
_Tools
Tools with an underscore are where the job is done. Underscored tools should
- get all parameters needed for a calculation directly as arguments.
- perform the calculations.
- assert that all arguments have valid values. For example, they need
to check whether parameters that only should be positive are negative. You
could use the check decorators defined in
nnmt.utilsfor this. - raise warnings if valid parameter regime is left. For example if the assumptions made in the underlying theory are not fulfilled by the parameters.
- raise errors if return values are meaningless, for example if negative rates would be returned.
Have a look at the source code of nnmt.lif.exp._firing_rate_shift() if
you would like to see an example.
Wrappers
To make an underscored tool compatible with the convience layer, a.k.a. models, it gets a wrapper withouth an underscore. The non underscored wrappers should
- expect an
nnmt.modelas argument. - check that all parameters and results needed are stored in the model.
- invoces the
nnmt.utils._cache()function to store the results in the model instance.
Have a look at the source code of nnmt.lif.exp.firing_rates() if you
would like to see an example.
Models
Models are Python classes that serve as containers for network parameters, analysis parameters, and results. They come with some convenience methods for changing parameters, saving, and loading results.
Typically, one wants to define parameters in some sort of parameter file (we
usually use yaml files for this), load them, and then calculate further,
dependent parameters from these. The details of how these dependent parameters
are calculated depend on the model that one is planning to investigate.
Defining a custom model class allows users to do this in an organized setting.
A model should
be a subclass of the generic
nnmt.models.Networkclass and invoke the parent__init__()method. The model’s__init__()method should start withdef __init__(self, network_params=None, analysis_params=None, file=None): super().__init__(network_params, analysis_params, file)
implement the
_instantiate()method:def _instantiate(self, new_network_params, new_analysis_params): return <MyModel>(new_network_params, new_analysis_params)
_instantiate()is invoked when<MyModel>.change_parameters()is called and a new instance of the model is created.calculate dependent parameters when instantiated. For that purpose, you can add methods to your subclass and call them in the
__init__()method. Note that if you useyamlfiles to store parameters including units, the loaded parameters are PintQuantityobjects at this point. You might run into problems if imported functions from different packages are not compatible withQuantityobjects.call
self._convert_param_dicts_to_base_units_and_strip_units()at the end of the__init__()method. This will convert all calculated parameters to SI units, strip the respective units off, and store them in the dictionaryinput_units.
The microcircuit model nnmt.models.Microcircuit is a good example of
how a model class looks like.
If you would like to add your model to nnmt.models, do not forget to add
from .<my_model_module> import *
to nnmt.models.__init__.py.
Input and output functions
The submodule nnmt.input_output contains all functions which called for
all input output related actions, like saving and loading results, or loading
parameter files.
We have written a very basic wrapper which allows storing and loading Python
dictionaries in HDF5 files.
Similarly, we have written wrappers which allow loading dictionaries of Pint
Quantity objects as yaml files and vice versa.
Utility functions
The submodule nnmt.utils is a collection of convenient functions used
frequently throughout NNMT.
There you find the nnmt.utils._cache() function, which is called by the
wrappers of the underscored tools. It stores the results returned by a
underscored tool in the result related dictionaries of the model that was
passed to the wrapper. If you are looking for an example of how to apply the
_cache function have a look at the source code of
nnmt.lif.exp.firing_rates().
The module contains some decorators used to check that parameters passed to a
_tool have valid values. E.g. nnmt.utils._check_positive_params() or
nnmt.utils._check_k_in_fast_synaptic_regime().
Finally, it contains some utility functions for handling Pint Quantity
objects.
Tests
All tools, models, and utilities should be tested using our pytest test
suite. We have collected all the details in the section about
Tests.
Documentation
We automatically create this documentation using
Sphinx.
Sphinx collects all the docstrings and the rst files in
nnmt/docs/source/ and creates these beautiful documentation html files.
Compiling the docs
In order to compile the documentation, you have to change your working
directory to nnmt/ and install and activate the provided conda environment
conda env create -f environment.yaml
conda activate nnmt
Change you working directory to nnmt/docs/ and run the following commands
make clean
make html
This will compile the documentation and create the folder build/.
Now you can access the documentation using your preferred browser by opening
the file build/html/index.html.
Special files
nnmt/docs/source/conf.py defines all the Sphinx configurations, which
extensions are used, and details about the html output.
nnmt/docs/source/index.rst configures the access page to the documentation.
rst files
Everything you see in this documentation that is not part of a docstring is
written in the rst files in nnmt/docs/source/.
Docstrings
We try to follow the PEP 8 standard and the NumPy docstring conventions as close as possible.
Dosctrings should be written using rst syntax, which allows cross-references and citations.
Modules
Each module needs to start with its own docstring, beginning with a short description of its content, followed by a list of the functions which are to be shown in the documentation. The functions can be divided by different headings, followed by an Sphinx autosummary directive. A generic example of such a docstring would be
'''
This module contains functions for doing awesome things.

My Favorites
************

.. autosummary::
    :toctree: _toctree/my_module/

    function1
    function2

'''
Example: nnmt.input_output
Functions
Wrappers of _tools should reference the respective _tools.
The docstrings of _tools should give a detailed explanation of all their arguments.
Examples: nnmt.lif.exp._firing_rates(), nnmt.lif.exp.firing_rates()
Models
Example: nnmt.models.Microcircuit
Versioning
We follow Semantic Versioning. To cite the linked page:
Given a version number MAJOR.MINOR.PATCH, increment the:
- MAJOR version when you make incompatible API changes,
- MINOR version when you add functionality in a backwards compatible manner, and
- PATCH version when you make backwards compatible bug fixes.
Before releasing a new version, the version number should be updated in
setup.py,nnmt/__init__.py, andnnmt/docs/source/conf.py,
a release note should be added, and the list of authors and contributors, as well as the acknowledgements should be updated if required.
How to publish a new release
Please follow our step-by-step guide for publishing a new release.